“寒塘数树梅,常近腊前开。”
好吧, 开摆了是, 本来打算仿仿这个动画 , 但是一场无情的流感打败了我,一直都不是很有精神, 只能先写点简单的来找找状态了.
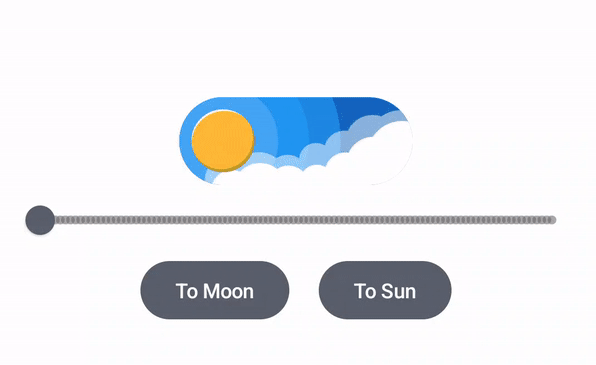
同样的原版效果如下, 代码可以访问codeopen.io 来查看.
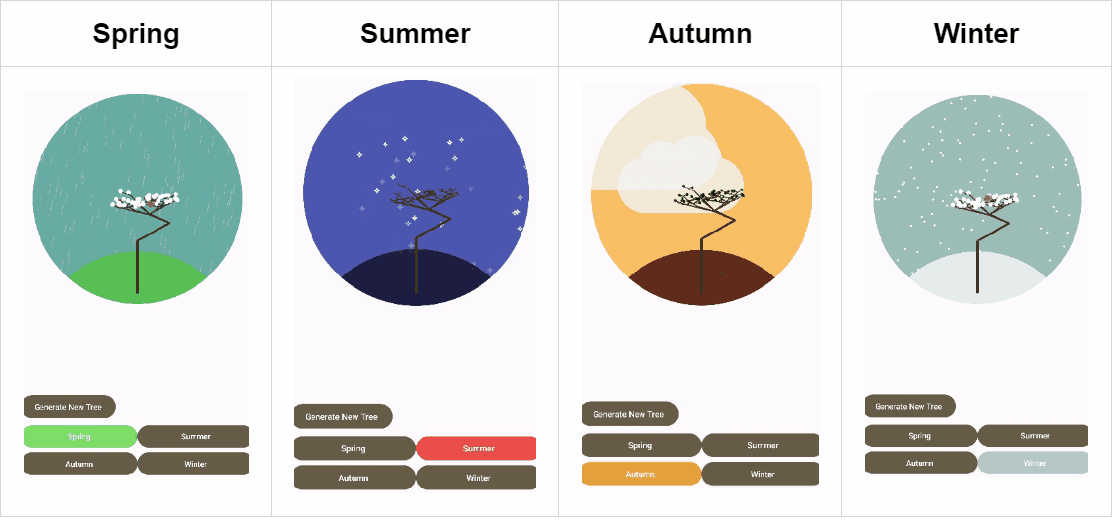
这个是实现的效果, 虽然有时候长出来的树显得不拘一格, 但是最终的效果还是差强人意的.
虽然看起来简单, 但是写起来却一点也不难. 刚好结合着Compose一块来复习复习单纯的”树”.
本来是打算这么写的, 但是写完后发现没啥内容啊, 最难的事情可能就是如何生成一颗看的过去的腊梅树了吧.
所以最后添加了一个四季的情况, 春天的雨, 夏天的夜, 秋天的光, 冬天的雪. 每个季节还留了一个小彩蛋动画, 也算是把compose中对canvas的使用情况的一个大复习吧.
Spring
Summer
Autumn
Winter
canvas 是我个人认为传统Java View和Kotlin Compose中最为接近的一部分了 先说说为什么会有这样的结论. 诚然, Compose对Canvas也进行了底层设计和架构的重写, 但是当我们在Kotlin中使用Canvas时, 我们不仅仅会觉得各个接口的使用方法类似, 更主要的是设计思路的类似.
大概体现在于我找资料的时候, 如果我使用的不是Kotlin Compose中新增的特性的话, 我经常会发现”Java View 体系下的Canvas资料也能用?”. 当然不能直接使用,不过其提供的思路确实可以解决不少新的问题.
究其原因, “Java View 体系下的Canvas具有很大部分的响应式编程的思路.” 再激进一点, “onDraw(Canvas canvas)方法就是一个@Compose.”
我们回想一下, onDraw()是不是和我们通常的View控制格格不入? onDraw()的返回值是void, 意味着我们不能直接操作其对应的内容. 所以我们如果想要修改onDraw()显示的效果, 我们需要通过提前定义好的变量去控制. onDraw()中的内容需要我们主动或被动的触发才会改变. 我们再想想我们在使用onDraw(Canvas canvas)遇到的各种不适应, 是不是我们使用@Compose时遇到的不适应有点类似?
或者说, 在Java View下的一个Canvas中有一个圆形, 我们需要在页面某个按钮按下时改变其颜色. 如果我们将这个需求放到Kotlin Compose下呢?
对比会发现有效监听按钮点击的代码比圆形的显示和颜色变化之间的设计和实现思路大多了.
当然, 以上都是行文至此时突然的有感而发, 大胆假设, 如果各位有兴趣的话我也会详细的写一点”小心求证”的文章也.
回来再看看这颗腊梅树, 设计还都是比较简单的. 主要的就是天空, 土地, 还有树的本身. 只不过各个季节都有自己的一些特色. 那就来一一的进行说明.
腊梅树 作为绝对的主角和C位, 腊梅树的生成和实现都是比较丰富的.
1
2
3
4
5
6
7
8
9
10
11
12
13
14
15
16
17
18
19
20
21
22
23
24
25
26
27
28
29
30
31
32
33
34
35
36
37
38
data class TreeNode ( var deep: Int = 0 , var angle: Float = 0f , var type: TreeType = TreeType.TREE, var child: List<TreeNode> = listOf(), var length: Dp = 0. dp, var startOffset: Offset = Offset(0f , 0f ) ) private fun genNewTree (deep: Int , length: Dp ) val treeNode = TreeNode() treeNode.deep = deep if (length < minLength.dp) { flowerCount++ treeNode.type = if (flowerCount % 100 == 0 ) { TreeType.FRUIT } else { TreeType.FLOWER } return treeNode } treeNode.type = TreeType.TREE treeNode.length = length * (random.nextInt(2 ) / 10f + 0.6f ) treeNode.angle = (if (random.nextFloat() > 0.5f ) 1f else -1f ) * (random.nextInt(20 + deep * 5 ) + 45 ) for (i in 0 until random.nextInt(3 ) + 1 ) { treeNode.child += genNewTree(deep + 1 , treeNode.length) } return treeNode }
作为常用和基础的数据结构之一, 树大家应用都不陌生. 一般情况下大家对于这样的小树都是用递归的方式来进行生成和遍历. 这里我们同样使用递归的方法来生成一棵树.
不过受到Compose下Canvas内递归调用麻烦的限制, 我们采用循环+队列的方式来进行树的遍历.
1
2
3
4
5
6
7
8
9
10
11
12
13
14
15
16
17
18
19
20
21
22
23
24
25
26
27
28
29
30
31
32
33
34
35
36
37
38
39
40
41
42
43
44
45
46
47
48
49
50
51
52
53
54
55
56
57
58
59
60
61
62
63
64
65
66
67
68
69
70
71
72
73
val tree = genNewTrees(seed)val baseTreeLength = mBaseCircle / 4f Canvas( modifier = Modifier .width(mBaseCircle) .height(mBaseCircle) .offset(mBaseCircle / 2f , mBaseCircle), ) { drawLine( color = treeColor, start = Offset(x = 0f , y = -mBaseCirclePx / 20f ), end = Offset(0f , -baseTreeLength.toPx() - mBaseCirclePx / 20f ), strokeWidth = 10f , ) val treeQueue: Queue<TreeNode> = ArrayDeque() val flowerQueue: Queue<TreeNode> = ArrayDeque() val fruitQueue: Queue<TreeNode> = ArrayDeque() var downTreeNode: TreeNode? = null for (treeNode in tree.child) { treeNode.startOffset = Offset(0f , -baseTreeLength.toPx() - mBaseCirclePx / 20f ) treeQueue.offer(treeNode) } while (treeQueue.isNotEmpty()) { val treeNode = treeQueue.poll() ?: break val angle = treeNode.angle val deep = treeNode.deep val type = treeNode.type val length = treeNode.length if (type == TreeType.TREE) { var treeWidth = 15f for (i in 0. .deep) { treeWidth *= 0.8f } val startOffset = treeNode.startOffset val currentEnd = Offset( x = startOffset.x + length.toPx() * sin(Math.toRadians(angle.toDouble())) .toFloat(), y = startOffset.y - length.toPx() * cos(Math.toRadians(angle.toDouble())) .toFloat(), ) drawLine( color = treeColor, start = startOffset, end = currentEnd, strokeWidth = treeWidth, ) treeNode.child.forEach { it.startOffset = currentEnd treeQueue.offer(it) } } if (type == TreeType.FLOWER) { if (downTreeNode == null ) { downTreeNode = treeNode } flowerQueue.offer(treeNode) } else if (type == TreeType.FRUIT && season != Season.Autumn) { fruitQueue.offer(treeNode) } }
额外的, 我们再针对一下不同季节情况下梅花的不同状态, 对腊梅的样式进行季节的匹配. (各个季节下腊梅的表现形式纯属个人臆断.)
当然, 初版之后我们还需要对生成的树尽心显示效果的微调, 避免生成的腊梅树太难看.
至此, 一棵腊梅树就可以生成和显示出来了.
春天的雨 提到春天, 我第一个想到的就是解缙的那句”春雨贵如油”了.
1
2
3
4
5
6
7
8
9
10
11
12
13
14
15
16
17
18
19
20
21
22
23
24
Canvas( modifier = Modifier .width(mBaseCircle) .height(mBaseCircle) .offset(mBaseCircle / 2f , mBaseCircle / 2f ) .rotate(10f ) .graphicsLayer { }, ) { for (i in -2. .2 ) { for (j in 0 until maxRains) { drawRoundRect( color = rainColor, size = Size(mBaseCirclePx / 400f , mBaseCirclePx / 20f ), cornerRadius = CornerRadius(size.minDimension / 2f ), topLeft = Offset( x = rainOffset[j]!!.x, y = mBaseCircle.value * offset + i * mBaseCircle.value + rainOffset[j]!!.y ), ) } } }
这里为了表现春雨的连绵不觉的感觉, 所以在一开就显示了雨的全过程, 用了一个很常见的的视觉错位的小技巧, 将相同的雨错位串联起来, 使其看起来是不间断连绵不绝的.
提到春雨, 就会不由自主的想到春雷, 所以春雨当中不时会掺杂着一丝春雷的出现.
1
2
3
4
5
6
7
8
9
10
11
12
13
14
15
16
17
18
19
20
21
22
23
24
25
26
27
28
29
30
31
32
33
34
35
36
37
38
39
40
41
private fun generateLights (light: LightNode ) if (light.next == null ) { return light } val next = light.next!! val distance = next.offset - light.offset if (distance.x * distance.x + distance.y * distance.y > 100 ) { val newLight = LightNode() newLight.offset = Offset( x = light.offset.x + distance.x / 2f , y = light.offset.y + distance.y / 2f , ) val newDistanceOffset = newLight.offset - light.offset val newDistance = sqrt((newDistanceOffset.x * newDistanceOffset.x + newDistanceOffset.y * newDistanceOffset.y).toDouble()) / 2f newLight.offset = Offset( x = (newLight.offset.x + newDistance * sin( Math.toRadians( random.nextInt(360 ).toDouble() ) )).toFloat(), y = (newLight.offset.y + newDistance * cos( Math.toRadians( random.nextInt(360 ).toDouble() ) )).toFloat() ) newLight.next = next light.next = newLight return generateLights(light) } else { light.next = generateLights(next) return light } }
雷的生成相比于腊梅树的生成来说要复杂不少, 简单来说, 就是在AB两点之间取一个有效的位置C, 然后在C的一定范围内寻找一个点C′, 使其变成AC′B. 不断的重复这个动作, 直到无法再任意两点间找到有效的位置(任意两点距离都过近). 所以最终的结果是一个单链表.
1
2
3
4
5
6
7
8
9
10
11
12
13
14
15
16
17
18
19
Canvas( modifier = Modifier .width(mBaseCircle) .height(mBaseCircle) .background(if (showLight) lightSkyColor else Color.Transparent) .offset(mBaseCircle / 2f , mBaseCircle) ) { var currentLight = lights while (currentLight.next != null ) { drawLine( color = lightColor, start = currentLight.offset, end = currentLight.next!!.offset, strokeWidth = 8f , ) currentLight = currentLight.next!! } }
想对于生成, 显示来说就简单了许多.
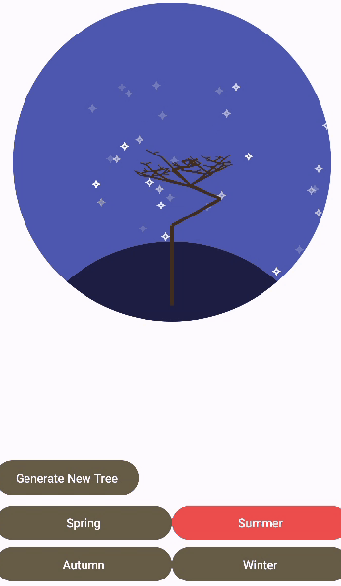
夏天的夜 夏天嘛, 当然是入夜后伴着清凉的晚风抬头看到的星空了. 虽然现在城市中不再能看到那漫天闪烁的星星了, 但我们可以自己做一个不是?
1
2
3
4
5
6
7
8
9
10
11
12
13
14
15
16
17
18
19
20
21
22
23
24
25
26
27
28
29
30
31
32
33
34
35
36
for (i in 0. .maxStart) { val alpha: Float by infiniteTransition.animateFloat( initialValue = 0f , targetValue = 1f , animationSpec = infiniteRepeatable( animation = tween( durationMillis = 3011 , easing = LinearEasing, delayMillis = if (random.nextInt(3011 * 2 ) - 3011 / 2f < 0 ) { 0 } else { random.nextInt(3011 * 2 ) - 3011 / 2f }.toInt(), ), repeatMode = RepeatMode.Reverse, ), ) alphaList.add(alpha) } Canvas( modifier = Modifier .width(mBaseCircle) .height(mBaseCircle) .offset(x = mBaseCircle / 2f , y = mBaseCircle / 2f ), ) { for (i in 0. .maxStart) { val startLengthOut = mBaseCirclePx / 70f val startOffsetOut = startLengthOut / 3F ... }
看着挺复杂的, 实际上都是些重复的部分. 这里用了个infiniteTransition.animateFloat做对应的插值器, 为了能不再一块闪烁, 所以对不同的星星设置了个不同的延时. 至于延时的时间为什么有的是整千帮百的数字, 有的不是. 主要的考量是这些动作是否要同步. 比如星星的闪烁, 当然不需要同步, 而且其最小公倍数越小, 其显示的效果越好, 越不容易重复.
夜空嘛, 也一定需要有流星的. 所以夏天的也也会不定时的出现流星.
1 2 3 4 5 6 7 8 9 10 11 12 13 14 15 16 17 18 19 20 21 22 23 24 25 26 27 28 29 30 31 32 33 34 35 36 37 38 39 40 41 42 43 44 45 LaunchedEffect(Unit ) { while (true ) { delay(delayTime) showMeteor = true rotate = -30 + Random(rotate.toInt()).nextInt(90 ).toFloat() offsetY = -mBaseCirclePx / 3f + Random(offsetY.toInt()).nextInt(10 ) / 10f * mBaseCirclePx / 6f delay(runTime) showMeteor = false } } Canvas( modifier = Modifier .width(mBaseCircle) .height(mBaseCircle) .rotate(rotate) .offset(mBaseCircle / 2f , mBaseCircle / 2f ) .graphicsLayer { translationX = mBaseCircle.toPx() * offset translationY = offsetY }, ) { if (showMeteor) { var meterSize = 15f var meterOffset = -meterSize / 2 for (i in 0. .10 ) { meterSize *= 0.8f if (meterSize < 5f ) { meterSize = 5f } val path = Path() path.moveTo(meterOffset + 0f , meterSize) path.lineTo(meterOffset + meterSize, 0f ) path.lineTo(meterOffset + 0f , -meterSize) path.lineTo(meterOffset + -meterSize, 0f ) path.lineTo(meterOffset + 0f , meterSize) drawPath(path = path, color = Color.White) meterOffset += if (i < 3 ) -meterSize else -meterSize * random.nextInt(3 ) + 1 } } }
通过LaunchedEffect来实现一个简单的延时和定时动作, 绘制一个流星划过的情况就好.
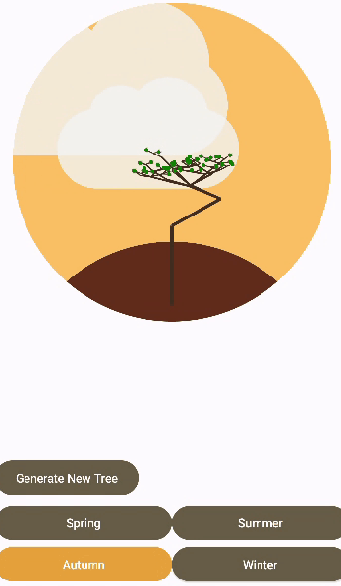
秋天的光 说实话, 秋天的第一印象是丰枝硕果, 但是腊梅它秋天才开始抽枝发芽… 所以只能退而求其次选择一个秋高气爽的效果了. 也是原版的云彩浮动的效果.
1
2
3
4
5
6
7
8
9
10
11
12
13
14
15
16
17
18
19
20
21
22
23
24
25
26
27
28
Canvas( modifier = Modifier .width(mBaseCircle) .height(mBaseCircle) .offset( x = mBaseCircle / 2f * offset, y = -mBaseCircle / 6f , ) .alpha(0.8f ), ) { drawRoundRect( color = cloudColor, size = Size(width = size.width / 7f * 4f , height = size.height / 4f ), cornerRadius = CornerRadius(size.minDimension / 2f ), topLeft = Offset(x = center.x - size.width / 4f , y = center.y), ) drawCircle( color = cloudColor, radius = size.minDimension / 10f , center = Offset(x = center.x - size.width / 20f , y = center.y + size.height / 40f ), ) drawCircle( color = cloudColor, radius = size.minDimension / 8f , center = Offset(x = center.x + size.width / 10f , y = center.y + size.height / 40f ), ) }
说实话, 云彩就是一个又一个的圆, 简简单单动一下就行, 和其他的一些特效比起来, 这两朵云彩简直是人畜无害的代表.
前面说到, 腊梅秋天是才抽枝发芽的, 但话又说回来, 果实掉不下来, 掉点嫩芽也不是不行嘛.
1
2
3
4
5
6
7
8
9
10
11
12
13
14
15
16
17
18
19
private val EaseOutBounce = Easing { fraction -> val n1 = 7.5625f val d1 = 2.75f var newFraction = fraction return @Easing if (newFraction < 1f / d1) { n1 * newFraction * newFraction } else if (newFraction < 2f / d1) { newFraction -= 1.5f / d1 n1 * newFraction * newFraction + 0.75f } else if (newFraction < 2.5f / d1) { newFraction -= 2.25f / d1 n1 * newFraction * newFraction + 0.9375f } else { newFraction -= 2.625f / d1 n1 * newFraction * newFraction + 0.984375f } }
动作的话就不需要再体现了, 一个简单的y轴移动就好了, 这里着重说一下跳动的插值器, Compose中Easing的插值器是不包含这个效果的. 所以需要我们仿写一个类似的插值器效果.
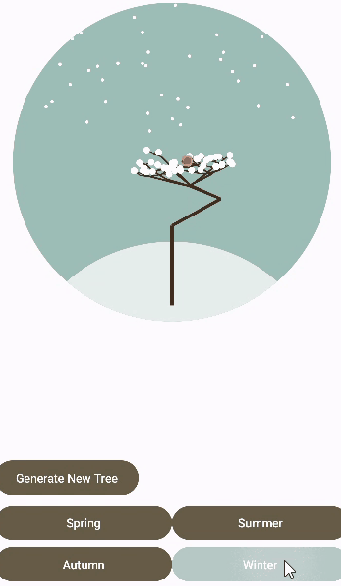
冬天的雪 雪, 雪, 还是雪. 没有什么能够比雪更能代表冬天.
所以冬天的效果就是一个落雪的效果.
1
2
3
4
5
6
7
8
9
10
11
12
13
14
15
16
17
18
19
20
21
22
23
24
25
26
27
28
29
30
31
32
33
34
35
36
37
38
39
40
41
42
for (i in 0. .maxSnow) { offsetList[i] = Offset( -mBaseCirclePx / 2f + random.nextInt(mBaseCirclePx.toInt()), -mBaseCirclePx / 10f ) } for (i in 0. .maxSnow) { val offsetY: Float by infiniteTransition.animateFloat( initialValue = 0f , targetValue = 1f , animationSpec = infiniteRepeatable( animation = tween( durationMillis = 3011 , easing = LinearEasing, delayMillis = (random.nextInt(3011 * 2 ) - 3011 / 2f ).toInt() ), repeatMode = RepeatMode.Restart, ), ) offsetYList.add(offsetY) } Canvas( modifier = Modifier .width(mBaseCircle) .height(mBaseCircle) .offset(x = mBaseCircle / 2f , y = 0. dp), ) { for (i in 0. .maxSnow) { drawCircle( color = Color.White, radius = 5f , center = Offset( x = offsetList[i]!!.x, y = offsetList[i]!!.y + mBaseCirclePx * offsetYList[i] ), ) } }
其实最开始的情况是想要每个雪落下的时候的路径都是一个贝塞尔曲线的效果, 但是写到这的时候, 精力和耐心都消磨了大半, 加上落雪的数量有点多, 已经有一点卡顿的情况, 就没有实现最初的效果, 只是让雪简单的落下.
1
2
3
4
5
6
7
8
9
10
11
12
13
14
15
16
17
18
19
20
21
22
23
24
25
26
27
28
29
30
31
32
33
34
35
36
37
38
39
40
41
42
43
44
45
46
47
48
49
50
51
52
53
54
55
56
57
58
59
60
61
62
63
64
65
Canvas( modifier = Modifier .width(mBaseCircle) .height(mBaseCircle) .rotate(90 * offset) .offset(x = mBaseCircle / 2f , y = mBaseCircle / 4f * 3 + mBaseCircle / 20f ), ) { drawCircle( color = Color.White, radius = mBaseCirclePx / 20f , center = Offset( x = (0f + sin(Math.toRadians(90.0 ) * offset) * mBaseCirclePx / 2f ).toFloat() + mBaseCirclePx / 4f , y = (0f + -cos(Math.toRadians(90.0 ) * offset) * mBaseCirclePx / 4f ).toFloat() + mBaseCirclePx / 4f , ), ) drawCircle( color = Color.White, radius = mBaseCirclePx / 30f , center = Offset( x = (0f + sin(Math.toRadians(90.0 ) * offset) * mBaseCirclePx / 2f ).toFloat() + mBaseCirclePx / 4f , y = (0f + -cos(Math.toRadians(90.0 ) * offset) * mBaseCirclePx / 4f ).toFloat() + mBaseCirclePx / 4f - mBaseCirclePx / 15f , ), ) drawCircle( color = Color.Black, radius = mBaseCirclePx / 30f / 5f , center = Offset( x = (0f + sin(Math.toRadians(90.0 ) * offset) * mBaseCirclePx / 2f ).toFloat() + mBaseCirclePx / 4f - mBaseCirclePx / 30f / 2f , y = (0f + -cos(Math.toRadians(90.0 ) * offset) * mBaseCirclePx / 4f ).toFloat() + mBaseCirclePx / 4f - mBaseCirclePx / 15f - mBaseCirclePx / 30f / 3f , ), ) drawCircle( color = Color.Black, radius = mBaseCirclePx / 30f / 5f , center = Offset( x = (0f + sin(Math.toRadians(90.0 ) * offset) * mBaseCirclePx / 2f ).toFloat() + mBaseCirclePx / 4f + mBaseCirclePx / 30f / 2f , y = (0f + -cos(Math.toRadians(90.0 ) * offset) * mBaseCirclePx / 4f ).toFloat() + mBaseCirclePx / 4f - mBaseCirclePx / 15f - mBaseCirclePx / 30f / 3f , ), ) drawCircle( color = Color.Red, radius = mBaseCirclePx / 30f / 10f , center = Offset( x = (0f + sin(Math.toRadians(90.0 ) * offset) * mBaseCirclePx / 2f ).toFloat() + mBaseCirclePx / 4f , y = (0f + -cos(Math.toRadians(90.0 ) * offset) * mBaseCirclePx / 4f ).toFloat() + mBaseCirclePx / 4f - mBaseCirclePx / 15f - mBaseCirclePx / 30f / 6f , ), ) drawArc( color = Color.Black, startAngle = 0f , sweepAngle = 180f , useCenter = false , topLeft = Offset( x = (0f + sin(Math.toRadians(90.0 ) * offset) * mBaseCirclePx / 2f ).toFloat() + mBaseCirclePx / 4f - mBaseCirclePx / 40f / 2f , y = (0f + -cos(Math.toRadians(90.0 ) * offset) * mBaseCirclePx / 4f ).toFloat() + mBaseCirclePx / 4f - mBaseCirclePx / 15f - mBaseCirclePx / 30f / 3f , ), size = Size(mBaseCirclePx / 40f , mBaseCirclePx / 40f ), )
另一个和雪有关的元素就是雪人了, 又是个偷懒的实现, 最初的想法是一边自己旋转, 一边在地上滑动的出现. 但是没有完成. 就成了现在的样子.
后记 总的来说, 整体的完成度都还不错, 除了冬, 原本的元素还被秋拿走, 又是最后设计的, 导致不少动画和其它季节有所重复, 有点虎头蛇尾的感觉吧.
但是整体还是不错的不是么.
代码地址:https://github.com/clwater/AndroidComposeCanvas/tree/master/app/src/main/java/com/clwater/compose_canvas/tree


.gif)